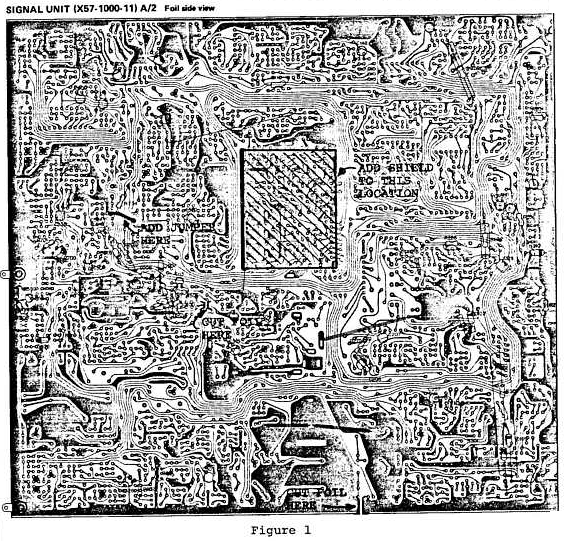
Some users of the TS-930S have reported that a hetrodyne is heard when the VFO control is turned in the CW mode. The tone may be more noticeable with no signal present, (e.g. no antenna connected.), or when the AF tune or CW PITCH controls are tuned. This may be reduced or eliminated by the following procedures.
Parts required
Qty     Description                 Kenwood part number
 1      Shield Kit                  Z930CARSHIELD
        Cover CAR 1                 F11-0813-04
        Shield CAR 1                F10-1308-04
        8.2 Kohm ¼ Watt Resistor
        22 Kohm ¼ Watt Resistor
        3 pF disc capacitor
        .5 pF disc capacitor
        1 pF disc capacitor
Procedure
- Remove the top and bottom covers from the TS-930S.
- Turn the radio bottom up to allow access to the Signal unit (X57-1000-11).
- Remove the twenty-two (22) screws that secure the Signal Unit/Heat sink to the chassis. Unplug the RAT, DRV, XVT, FRQ and the VCOF coaxial cables from the Signal unit. These are located along the rear and the left side of the Signal unit. Unplug connectors number (16) and (20) located along the right of the Signal unit.
- Gently lift up on the rear of the Signal unit and fold the board over towards the front panel to allow access to the bottom of the board.
- Install the shield plate as shown in figure 1. Cut the circuit foil and add the jumper wire as shown.
- Change the following components:
Change R635 to 8.2 Kohm
Change R501 to 22 Kohm
Change C469 to 3 pF
Change C473 to .5 pF
Change C476 to 1 pF
- Reinstall the Signal unit. Pay careful attention to the coaxial connectors when reinstalling to ensure they are in the correct locations.
- Install the top cover to CAR 1 enclosure to complete the Signal Unit modification.
- Turn the set over so top is up. Remove the four (4) screws that secure the speaker assembly to the chassis and lift up gently (unplug the battery backup connector). The assembly may then be folded over to the right with cables attached.
Remove the four (4) screws that secure the Digital assembly to the chassis and fold the assembly up and towards the front panel, to allow access to the PLL unit.
- Remove resistor R73 and capacitor C99 from the PLL unit.
- Reverse the procedure in step 9 to reinstall the Digital and Speaker units.
Adjustments.
- Connect an oscilloscope probe to the CAR 1 terminal (24) of the Signal unit. Adjust L161 for 300 mV p-p signal amplitude.
- Connect the oscilloscope probe to the emitter of Q79.
Adjust L142, L144, and L145 for maximum signal amplitude, then adjust L139 for 1 V p-p amplitude.
Note: Note the USB frequency before adjusting L139
- Adjust TC4, TC5, and TC6. (Refer to Service Manual)
- Adjust TC3 so the frequency is again the same as measured in step 2.
- Replace top and bottom covers to complete the modification.

|
