Be careful not to transmit outside the Amateur Bands.
RX: 30KHz-824MHz, 849MHz-859MHz, 894MHz-961MHz.
TX: 1.8MHz-30MHz, 50MHz-54MHz, 140MHz-174MHz, 420MHz-470MHz.
- Remove Front Panel from radio and open the rear cover from the Front Panel unit. Be careful, a cable connects them together.
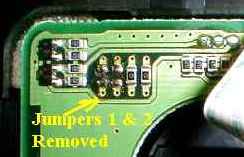
- Locate and remove R6035 (1) and R6036 (2) on the display board.
Note: The factory removed R6035 on my radio so I only had to remove R6036. You should end up like the picture below.
     _____________________________________________________
   /
  /   _ =
  |     =
  |   _ =  ! ! ! !    ! ! ! !
  |     =  1 2 3 4
  |        ! ! ! !
  |
  |
  |
Back of front panel. Top left corner.Remove jumpers 1 & 2, leave 3 & 4.

- Reassemble and install the Front Panel on the radio.
- Press and hold [DWN] and [STEP] keys; while holding them in, press and hold in the [PWR] switch for 1/2 second to turn the tranceiver On. Now let go of all keys.
The display will read "r on" for a 1/2 second or less (it may be so quick that you don't see it but continue with the mod).
- Set the dial frequency to 375.72727MHz and turn the power off.
Note: You may need to use LSB, USB, or CW to get the last digit.
- Press and hold [DWN] and [STEP] keys; while holding them in, press and hold in the [PWR] switch for 1/2 second to turn the tranceiver On. Now let go of all keys.
The display will read "HF on" for a 1/2 second or less (it may be so quick that you don't see it but continue with the mod).
- Set the dial frequency to 549.61163MHz and turn the power off.
- Press and hold [DWN] and [STEP] keys; while holding them in, press and hold in the [PWR] switch for 1/2 second to turn the tranceiver On. Now let go of all keys.
The display will read "vU on" for a 1/2 secondor less (it may be so quick that you don't see it but continue with the mod).
- The modification is complete. Turn the radio off and back on to continue.
|
